Compatibility
To confirm that this part fits your vehicle, please enter your vehicle's details below.
-
Year:
-
Make:
-
Model:
-
Submodel:
-
Trim:
-
Engine:
- Clear All
This part is compatible with 0 vehicle(s).
Show all compatible vehicles
This part is compatible with 1 vehicle(s) matching
This part is not compatible with
- Year
- Make
- Model
- Submodel
- Trim
- Engine
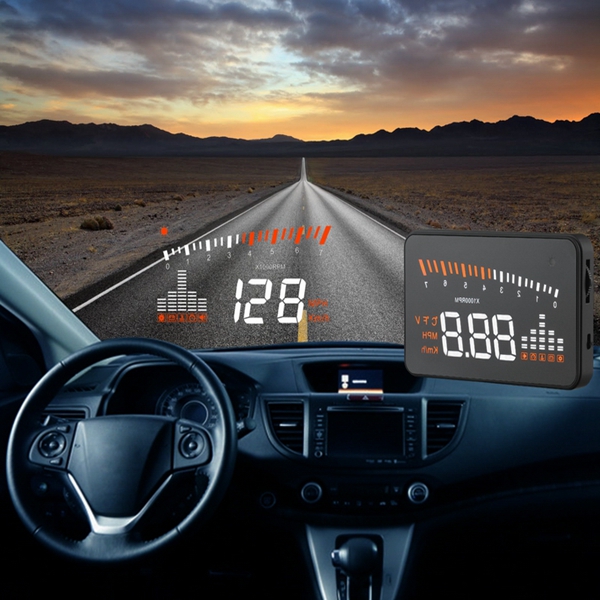
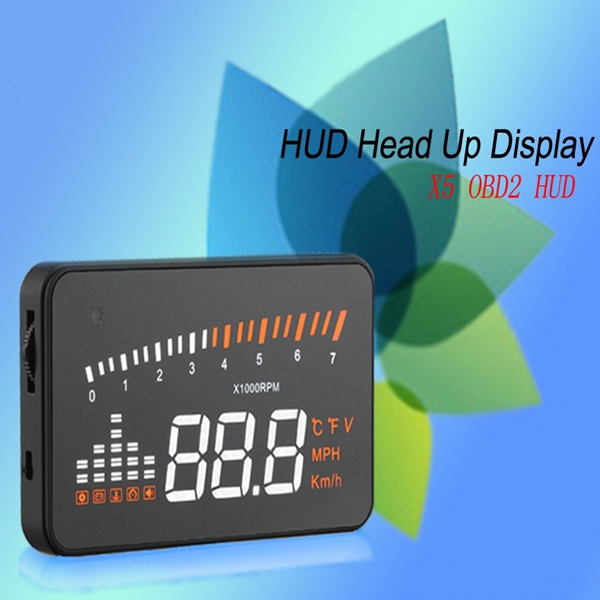
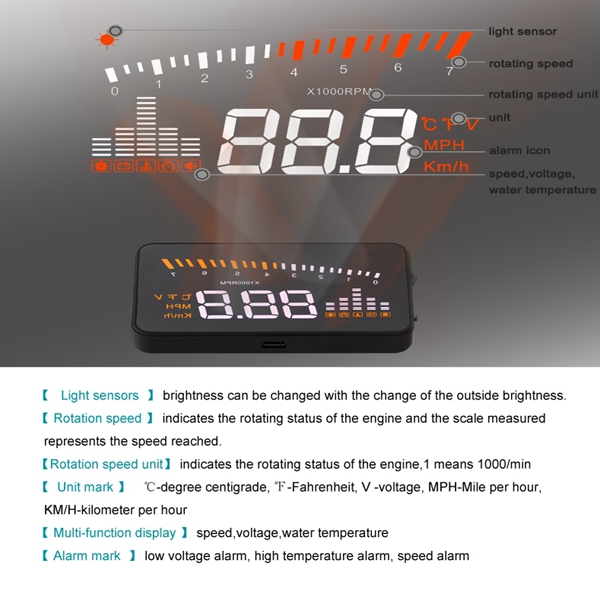
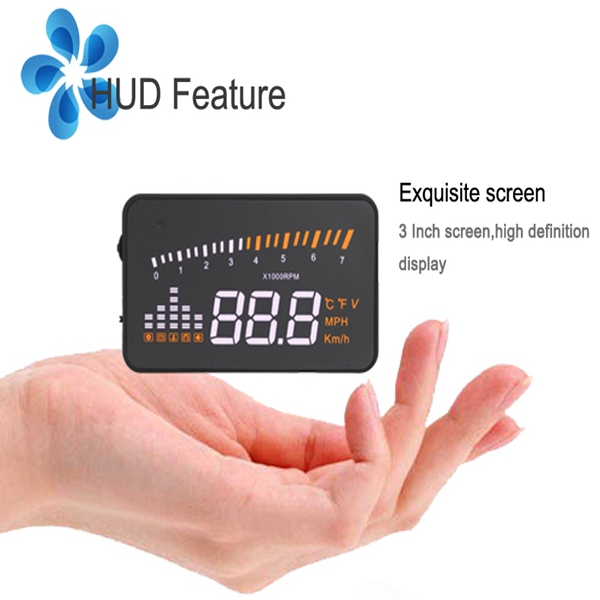
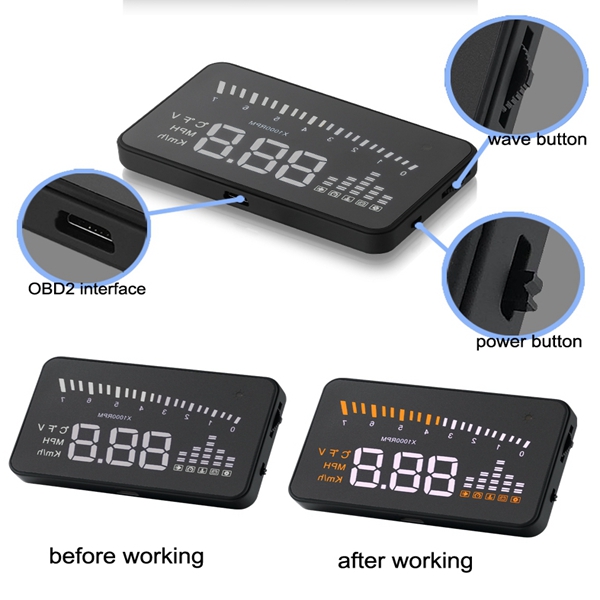
12V 3 Inch X5 Colorful OBD2 HD HUD 3 Inch Screen 9V to 16VPrompter Monitor Vehicle PC Alarm DetectorDescription:
1. Models automatically adapt to meet OBD II or EUOBD (automatic vehicle diagnostic system) models and Play;
2.3 Inches HD display;
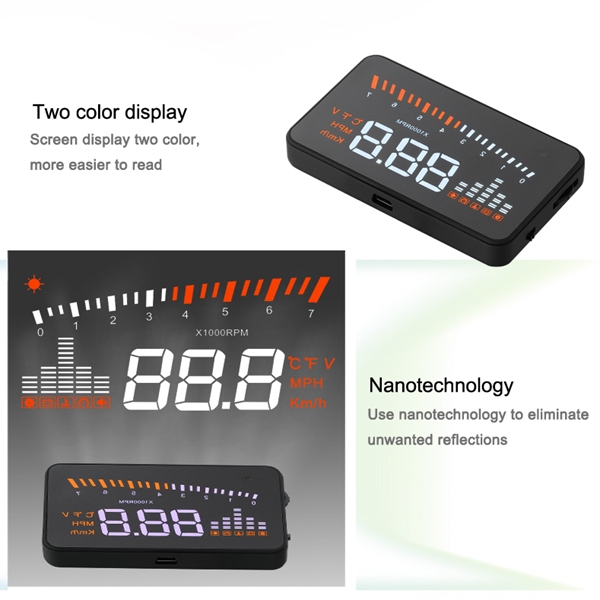
3. Polychromatic color design, so that the screen is more abundant, easier to read;
4. The use of nano technology to eliminate unwanted reflections sharper pictures;
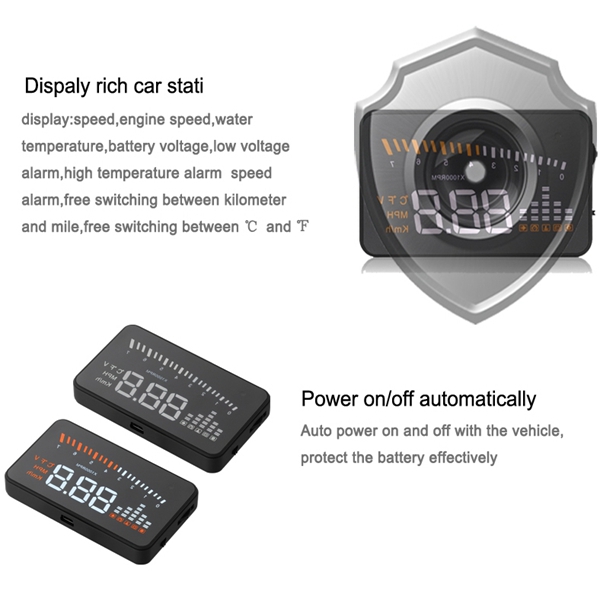
5. The display rich content: speed, engine speed, water temperature voltage instant fuel consumption, average fuel consumption, mileage measurement, shift reminding fatigue driving reminders, low voltage alarm high water temperature alarm, speed alarm, engine fault alarm, eliminate the fault code freely switch kilometers miles;
6. Switcher, vehicle start, lorry shutdown, effectively protect the car battery; while retaining the manual switch mode, more conducive to control HUD;
7. Automatic and manual brightness adjustment mode, driving without glare.
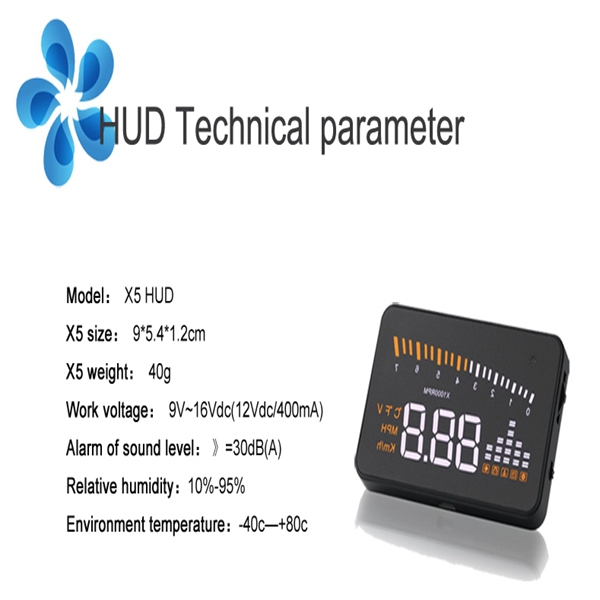
Specification:
|
 Ambient Temperature |
 - 40℃ ~ + 80℃ |
|
 Atmospheric |
 86 ~ 106KPa |
|
 Relative Humidity |
 10% ~ 95% |
|
 Environmental Noise |
 ≤60dB (A) |
|
 Alarm Sound Level |
 ≤30dB (A) |
|
 Operating Voltage |
 DC 9V ~ 16V (DC 12V / 400mA) |
|
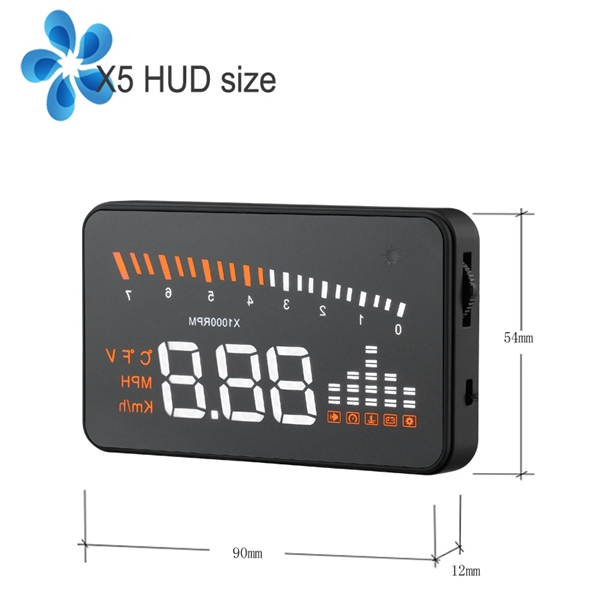
 Product Dimensions |
 9 * 5.4 * 1.2 (cm) |
|
 Product Weight |
 40g |
ÂÂ
HUD preparation before installation and use:
1. Know your car brand, at the time of purchase HUD to choose line with OBD II (or EU OBD) standard models for proper use, open the hood and look for the sticker below, if you have the words of OBDII CERTIFIED can be installed (Figure 1) check the bottom of the steering wheel have no car diagnostic socket (domestic car in 2007 after most of the car assembly).
2. Find the 16-pin diagnostic socket of the vehicle with OBDII cable with contact.
HUD initial use
Car name engine. HUD switch opens, showing the current vehicle voltage then enter the search car computer version of the state, if the HUD showing speed, rpm, indicates that the product has been installed successfully. (After 1 minute, or if the display voltage only then, check HUD hosts, OBD Interface OBD data line, the vehicle is properly connected, and make sure the connection is stable and reliable. Open HUD host power switch, start scanning again)
HUD solutions to common problems:
1. the screen without any display. Without electricity
Reason: start the car engine, check the OBD cable is connected to the elastic, pull down repeatedly insert multiple times, check HUD master switch is turned on. If you still do not show is recommended for test vehicles, whether cars OBD diagnostic interface is bad analysis, if the OBD diagnosis bad, it is recommended to maintain good OBD interface, HUD connection again, you can normally use
ÂÂ
2. powered on, but the screen only displays cars voltage, automatically turns off after 30 seconds.
Cause: HUD product is only suitable for OBDII and EOBD interface
Automobile production year (US Department of 2003, the other regions after 2007, began using OBDII and EOBD)
HUD Products Support OBD I and JOBD
ÂÂ
3. After the car is turned off, will not automatically shut down,
Cause: HUD automatic shutdown value is set to 13.2 volts, automotive voltage higher than 13.2 volts, automatic boot, lower than 13.2 volts, automatic shutdown, not shut down, then the item 7 parameter settings value adjusted 135, or a little higher, Do not be too high, preventing the car voltage reach the starting voltage can not be switched
ÂÂ
4. not clear and ghosting sunlight.
Solution: Check the HUD protection film on whether the host has torn, a reflective film on the box attached to the corresponding reflective glass HUD
ÂÂ
5 wrong operation lead to crashes.
Be reply to factory settings, HUD after connecting car, start the car,
 Dial key live dial five seconds, HUD full bright display, namely to restore factory settings, and then on the dial 5 seconds, return to display the page
ÂÂ
6. speed allowed. Countermeasures:
Under a power-up, the vertical press dial button for 5 seconds to enter the menu options, the menu display 0, the parameter value 107, a difference of how much, or allocated on the dial and according to your dashboard, increase and decrease the speed difference value. Exit After adjustment, dial key vertical press 5 seconds
ÂÂ
7 speed alarm.
Solution: The default alarm speed is 120
If you want to transfer large or small alarm tone,
Under a power-up, the vertical press dial button for 5 seconds to enter the menu option, short display 6, the parameter value of 120 indicates the speed 120 alarm, or allocated on the dial, increase and decrease, adjusting the press many times the menu, dial Exit 5 seconds after pressing the round key vertical
ÂÂ
8. How to restore factory settings:
  HUD After connecting car, start the car,
 Dial key live dial five seconds, HUD full bright display, namely to restore factory settings, and then on the dial 5 seconds, return to display the page.
Package Included:
1 X Displayer
1 X OBD Cable
1 X Mat
1 X Protect Film
1 X Manual